Friday 23 May 2014

Spondicious Photography News - David Allen Wizardgold

Frustrated photographer

Due to the constraints of work at the campsite for the summer I am not getting out with my camera has much as I would like to. I do have a day off each week and on my last day off I decided to work with the writing rather than going and taking some photos. In any case, I was expecting a day of rain and it was a cloudy, not a very bright day anyway. What I did instead of going out was to spend some time working on the new book that I am going to be publishing very soon. It is a book about photography and the applications I use for postprocessing. Included as part of the book there will be quite a few hours of video tutorials showing you how to use Aperture on the Mac and other applications such as Intensify Pro. There is even one video in there, showing you how to use the timelapse application which you can install directly onto the Sony NEX-6 camera.

David Allen Wizardgold Street Photographer

There are times when I can do some photography of the street street photography kind during the lunch break, but again due to the weather there hasn't been that many people passing where I sit and take my lunch.

I am enjoying the 55 to 210 mm lens on the Sony NEX-6 mirror-less camera. It is great for taking candid shots of people in the street doing what they do. I would still like to do some more testing with this handy new lens. With regards the kit that I'm using or rather not using - I do have to get around to selling the Canon 600D and also the 18mm - 200mm zoom lens which I will sell separately. I do have an advert put out locally for the camera, but there is nothing happening with it so I think I'm going to have to have a look at selling it through eBay.

Mad Metal

Fortunately I do still have some photos that are waiting for me in Aperture on my Mac to send out to the world. Here is one of the photos that I have published to Google+ and to Facebook recently. I also send my photos out to Flickr and to 500PX.

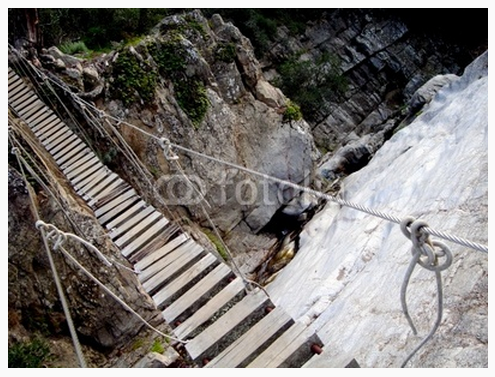
Hanging bridge

I sold a couple of photos this week

I have an account with Fotolia and a number of pictures in a portfolio ready for selling. This week I sold a couple of photos which is nice, seeing as I haven't sold many lately. Every now and then I have $50-$100 worth of sales that I download the cash into my PayPal account. This is the photo that I sold this week.

Wednesday 2 April 2014

Having a Macro Day is fun


I had only a few minutes before I was due to get myself out of the door to go to work, but I had an urge to take some shots with the Sony NEX 6 camera. So I quickly put the macro tubes on with the 18mm prime pancake lens and got stuck in and this is what I got.


Wednesday 26 March 2014

Ordered an adapter to use my Canon lenses on the Sony NEX 6

Meike Autofocus EOS to NEX Lens Adapter

I already bought a cheap adapter to be able to use the Tamron 18 to 200 mm lens that I bought last July as a catchall travel lens. It is handy to have just one lens that will do a huge range from wide angle to telephoto and I was very pleased with the lens when I used it on my Canon 600D. The cheap adapter that I bought doesn't allow any electrical connection between the camera and lens for setting the aperture or doing the autofocus.

Meike Electronic Auto Focus Adapter Tube Canon EOS EF Amazon co uk Camera Photo

Getting sharp images with manual focusing

On the NEX 6 I do get the ability to use focus peaking to be able to get good sharp photos with the manual focus. The only way to get the aperture set is to attach the lens to the Canon camera and set the aperture that you would most like to use. Once you have set it to that aperture opening then you can put it onto the NEX 6, but you can't change it again until you put it back on the Canon camera. So I have ordered the Meike autofocus tubes adapter to use with this lens. It will be handy to have the auto focus available to me although I believe the autofocus will be quite slow compared to using the actual Sony lenses. It will be useful to be able to use the autofocus, but more so being able to adjust the aperture setting.

Big and heavy

The lens is quite heavy and goes away from the initial reason for having the Sony NEX 6 in the first place. I can see that I will be using the kit lens, the 16mm pancake lens and maybe even the 50 mm Canon FD 1.8 lens more often. Even so, the Tamron lens is still going to be very useful to have in my camera bag. It won't be worth me selling on the cheap adapter that I bought for the Canon EOS lenses and it is as well that it wasn't too expensive to buy in the first place.

Sony E Mount SEL16F28 16mm f 2 8 Wide Angle Alpha SEL16F28 B H

My other favourite lens

The lens that I use quite often at the moment is the 16mm pancake lens which is a Sony E Mount. It is a particularly good lens for street photography and what I like about it is that because it has a very wide angle I can take pictures of people in the street and they don't even know their picture is being taken. It is thoughg, necessary to get quite close to the subject because it is such a wide angle. I often find it quite good to have something strong in the foreground that is really quite close to the camera and yet still pay attention to what is happening in the middle ground and background of the photo.

Thursday 13 February 2014

Getting my hands on a Pancake Lens for the Street Photography

Pancake Lens Ordered

Ordered a new lens for the NEX 6. The Sony SEL1628 pancake lens. Just the job for some street photography I think. With it being small and inconspicuous it will be great for travelling as it will be even easier to carry in my pocket. When I am out looking for candid shots to take in the street, people will not notice as much as if I was shooting with a massive lens. It will mean that I will have to use my feet to zoom in on a subject and also that I will have to get in closer because of it being a wide angle lens.

It will be sent to my mothers address in the UK and I will have to wait for it to be sent here in Catalonia then. Hopefully it will arrive before I make a trip to Ireland at the end of the month.

Tuesday 11 February 2014

Intensifying a photo with Intensify Pro

There are a number of in camera affects as I can apply to photographs I take with my Sony NEX-6 including effects that give me a wider dynamic range. The one effect is a HDR which merges three separate shots into one single image on camera and there is another one which is a dynamic range optimiser. Although these in camera effects are quite okay and possibly useful, it is not as good as doing the job on the computer properly with the proper software. That is the case either using an application like Photomatix Pro to get the really good, high quality HDR and when you have used the camera to take the bracketed shots necessary for this type of image, or if you want you can use an application like Intensify Pro.

With Intensify Pro you get a huge range of settings that you can make which will affect your final image. You can even use layers so that you can combine different settings into different parts of your image. As you can see from the video it is possible to use masking to paint an effect on in just certain places, or to use the eraser tool and to take the effects away from certain parts of the image too. There is even a gradient tool for the mask which can be set at any angle to get even finer control over the change from one affected area in the photograph to the effect that you choose for elsewhere in the image.

Hugin for Panoramas

Starting off with the presets in Intensify Pro

You can move the sliders on the settings to go from a subtle effect to something that might just destroy your photo. Part of the fun of post-processing photos Then you have all the combinations that can be set with things like the saturation, exposure and settings which you can use to bring out the texture within an image. You have an infinite number of possibilities when combining all of these and the application gives you a certain number of combinations which are presets. It can be very handy to take one of the presets and to make your own personal changes to the settings and then to save that as your own new preset.

There is a collection of presets that are going to give you black-and-white photographs, monochrome images, some of which are more suitable for landscapes and some are best used with portraits. In Intensify Pro photo processor it is quite handy to take one of these black and white presets and to then use the eraser and to bring back in the colour in just one area of the image. It is even possible for you to take one of these and to move the slider on the saturation setting back up, so that you once again have colour over the whole of the image. You might do that for instance, if you particularly like the overall settings of the preset but would prefer to have some colour.

Just like HDR - Well nearly!

There are two presets within the application that give you HDR like effects. One of them is a softer effect and the other is more vivid. These presets do give you images that are quite like what you might get from some of the settings within Photomatix Pro and could be handy to use if you only have one image to play with rather than a bracketed set. Mind you it is also possible to do a HDR photo with just one image within Photomatix Pro, if you need to. While the photos that you get from Intensify Pro are bright and bold and have a resemblance to the HDR tone mapping, they are not quite the full HDR. Even so, they are quite interesting.
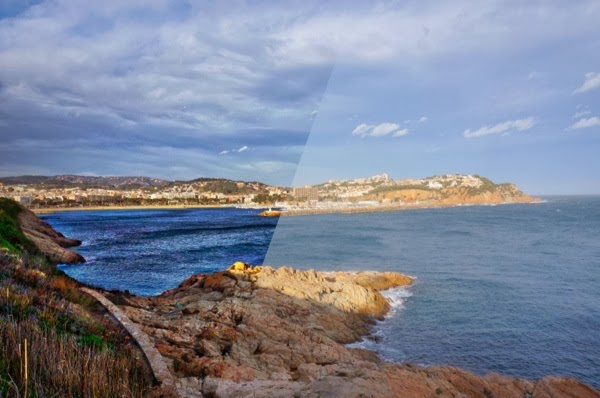
Intensify Pro example 2

An Easy Application to Work with

There is an icon that you can press so that you can see a before and after, or if you prefer you can go for a view which gives you the before and the after side-by-side. When you are working with the masks sometimes it can be easier if you can see the actual mask and with Intensify Pro you can switch the mask on. It shows up as a nearly opaque red layer over the top of your image.

I use the application from Apple called Aperture to deal with all of my photographs. It is much better than using iPhoto when you are working with a lot of photos. Aperture is also better in terms of the control you have of the effects within it and also for general organisation of your photos too. For these reasons I find it a good idea that I can use intensify pro as a plug-in from within Aperture.

When I have made all of the changes that I want from within the plug-in, I only have to click on Save and I am back in my photo management application. Aperture automatically makes a new version of the photograph that you are working with, so that you can work in a nondestructive way. You can go back to the original at any time and sometimes if you get carried away adding presets and completely messing up your photograph, that can be a good idea.

Monday 27 January 2014

Hugin Panorama App Tutorial

Create panoramas stitching photos together with Hugin

My lovely wee NEX-6 camera has the ability to provide me with panorama photographs created within the camera. It works, but I don't find it particularly easy to make it work. Sometimes it gives me the message that I am moving too fast with the camera and that even happens when I'm moving my camera very slow indeed. I sometimes think that's the wind has to be blowing in the right direction for me to be able to get the panoramic photo application working right on the camera. So I wanted to find a different way to do this, but not using Photoshop and I found a Mac application called Hugin. This application works quite well indeed for stitching together a number of photos into one single photo.

As simple as one, two, three

Hugin Panorama app 3

Hugin is quite a complex application in that it gives you lots of different options that you can choose from when you want to create a panorama photo. Having said that, it is possible to use this application in simple mode and then it is a case of steps one, two and three. Step one is to bring the photos into the application, step two is to align those photos by clicking on a button and step three is to create the panorama image. If you are not sure about any of the other possible configurations and changes that you can make within the application, you only have two press those three buttons and you will get a good panorama image. Assuming of course you took some good shots in the first place.

Seven different types of panorama to choose from

There are about seven different panorama types that you can choose from and in this tutorial I show you how to use either the rectilinear or the cylindrical panorama types. In the final images there is not a huge difference between the two. With the cylindrical panorama I found that the middle part of the image seemed to be a little bit closer in terms of the depth of the photo.

You can choose from three different file types when you output to the finished panorama you have the TIFF image, the JPEG image or a PNG image. If you use the TIFF image for your panorama it will be quite large, but you will get the best quality. I used the JPEG format and I was happy enough with the outcome. I stitched together eight photos and I am sure that I got a good result from this by having enough of an overlap in between each of the photos. I took all of the photos handheld and as there was some distance from the subject matter I was taking the photograph of it really didn't matter that I wasn't using a tripod. You can use this application even with cheap camera as well as with DSLR cameras or like me with mirrorless cameras like my Sony NEX6.

I finished off the photo post processing by using Intensify Pro plug in with Aperture on my Mac.

Which panorama making software do you prefer?

Leave a comment down below and I look forward to hearing from you.

Thursday 16 January 2014

The direction is mirrorless for cameras

 I love my NEX-6

While a lot of people might think that the direction for cameras is more in terms of there being an imaging device in every mobile phone you have to take into account the size of the centre and the quality of their age is always going to be better with a larger sensor. Proper cameras, from the Micro 4/3 cameras to the APS-C Sensor type cameras and onto the full frame professional imaging devices gather much more information and therefore the quality was going to be better. So while would like to have the latest Sony a 7 full frame top of the range mirrorless I have had to go for the mid-range NEX-6. I have to say that I'm absolutely delighted with this lovely little camera and the fact that it is small was one of my main choices for choosing to say goodbye to the DSLR Canon 600 D. The NEX-6 is small enough and light enough that I can pretty much always have it with me, either in the inside pocket of my jacket or in the bag that I carry and I even have a nice little clip that I can hook the camera onto the straps of my rucksack so it is even more available to use.


Better camera better software

The NEX-6 has much better software than does the Canon 600 D and I think that overall is a much better camera. The only thing that I find is missing on the NEX-6 is the input jack for a microphone. I am not too worried about that because I have the Giant Squid lapel microphone that I connect to the old iPhone so that I can record the audio externally. It is very easy in Final Cut Pro X to synchronise the audio and video from two different sources and to have good quality audio for my videos.

There are some people that complain about the fact that the video recorded on the Sony NEX-6 is of the AVC HD variety, but although there is one extra step in being able to get them video into Final Cut Pro X I find that it works well enough for me. The fact that the video benefits from the constant auto focus means that I can set the camera up and go in stand in front of it and be fairly sure that the main subject of the video, me will be perfectly in focus as I record. The NEX-6 also has the ability to prioritise focusing on faces, as I said the software in the NEX-6 is much better and much more advanced.

Extra applications to run on the NEX-6 camera

There are one or two applications, some that are free and some that you have to buy that you can use to extend the functionality of the NEX-6 camera. The one I have found very useful so far is the remote control application that works with the Wi-Fi and external applications that you run on your mobile device. I use this combination of technology to connect to my Nexus 7 and I find it very useful being able to see exactly how the composition of the video shot or photo is going to work out before I shoot it. I can change a number of the settings using this remote control application, such as the aperture or shutter speed as well as the ISO setting and I can also use the zoom. It would be nice if this application also allowed me to start the video, maybe that is a feature that will come in a future version.

Timelapse photography


I bought the Sony time-lapse application which was £7.99 and this gives me the tools that I can use to shoot a number of still photos and have them combined into a video. The video is formatted as an AVI file and I have found that I can import that directly into Final Cut Pro, I thought I would have to convert it first. There are plenty of settings that can be change within the standard presets which are called themes in the timelapse application and there is also a custom theme which can be altered even more.